Hi everyone
On IoT terminal often the hard disk is small, and there is a activity that can be a pain in such device, it's to install a cumulative update.
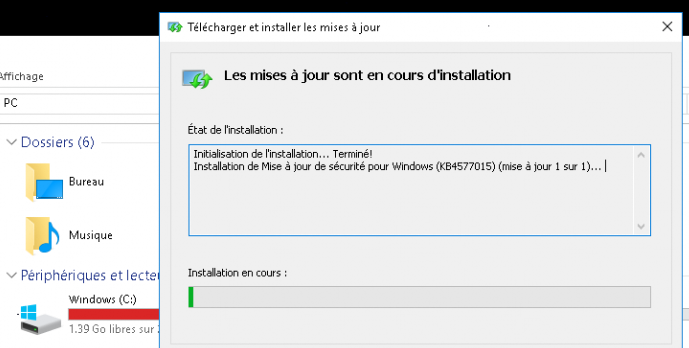
The last update I did I had in example 7gigs of free space, and the uncompressing of the patch did fill the space completely to make the update fail.
To show the problem you can see these printscreens, please remark the free space available;
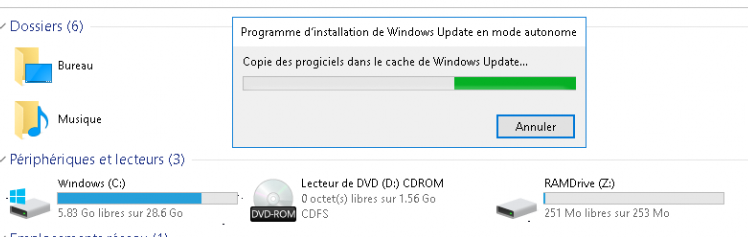
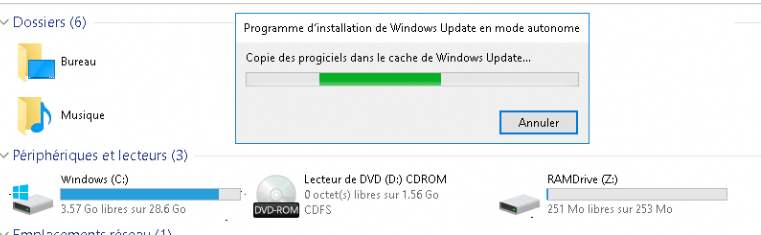
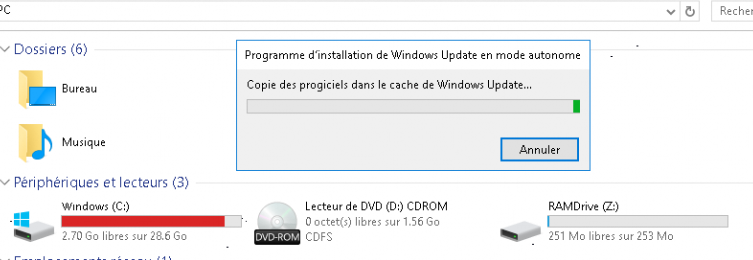
In my example in my struggle to install the patch, which is by itself 1.6gig, I tried to run the patch from the network, but voila, it's not possible. You would receive such 0x80070003 error.
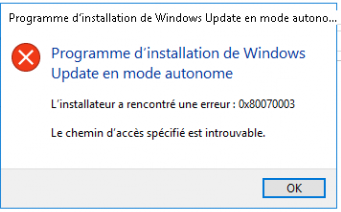
The tip I give today is to make an ISO with the patch, so you can mount the .ISO from a network share to trick the system.
I my case as Windows can't make the ISO natively, I got a free tool to make the job, wincdemu. A lot of other tool exist to make that work by the way.
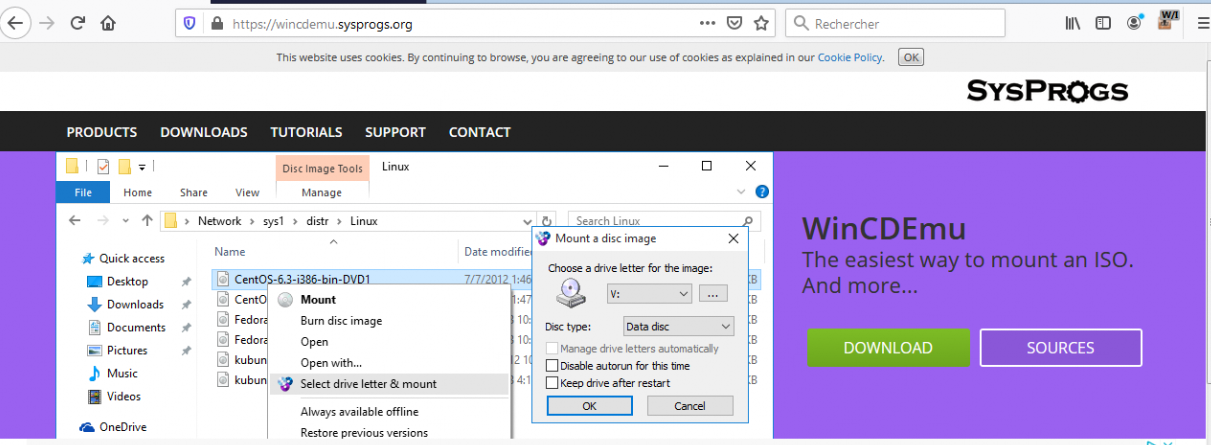
After the tool is installed, you can just right click your update folder, and select the Build an ISO image option.
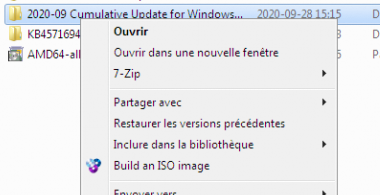
You can name the ISO like patch.ISO.

In the Windows after you can mount the ISO to run the setup from there.


At that point you can wait.
Thanks everyone, hope the tip help some
Windows 10 - Unified Write Filter - Quick tip for the monitor resolution
September 25, 2020, 3:51 pm technology
Hi everyone
Today I wanted to share a quick tip if you want to allow your users to set their own resolution.
By default the unified write filter allow some registry key, but when a user set a resolution, that setting currently impact all users sessions, so that specific setting is inside the HKLM.
As the seeting can change depending on the terminal you use, I would give you the tip to find the correct keys.
I used process monitor, and I log what SystemSettings do in the registry when you click to change the resolution, in example;
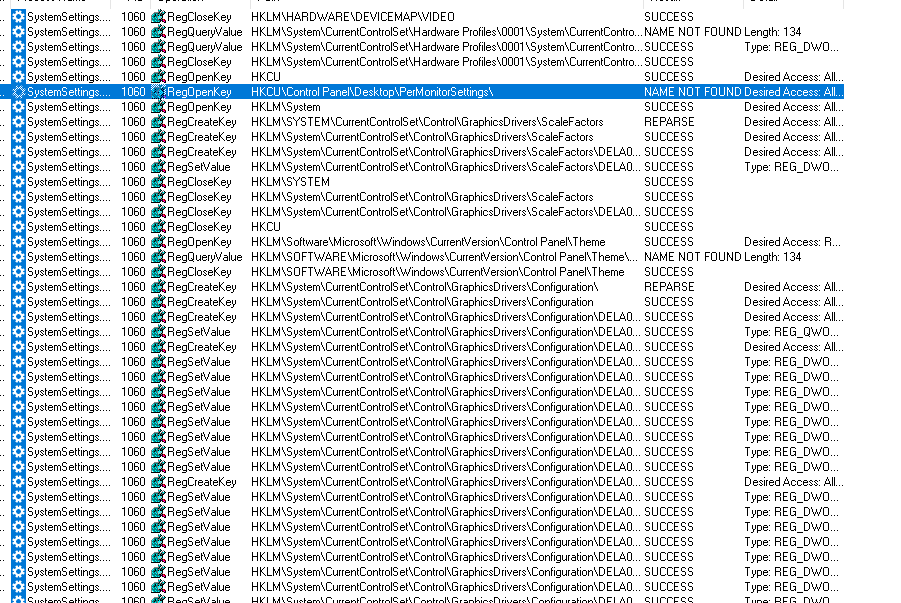
As you can see, the registry key might be long, you can select to easilly copy it;
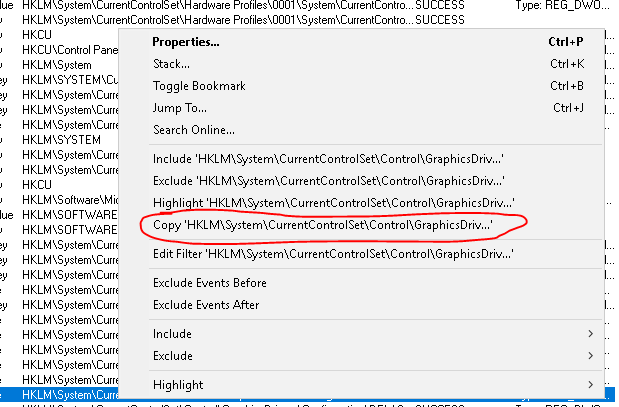
Inside the terminal after, add the exception for that registry key hive;

Thanks for the reading
Hi everyone, today I waned to share a small tip that not everyone know; how to send the famous key stroke CTRL-ALT-DELETE to the remote system in Remote Desktop.
It's always useful, in case you want to bring the task manager, or to try to recover from a unresponsible session.
ctrl+alt+end is the prescribed way to do this.
A small tip it's, but it's handy to have :)
You can see other shortcut there; Remote Desktop Tips and Tricks
Hi everyone
Today I wanted to share a small problem with Windows 10's newer build, 2004.
Login script that use net use no longer seem able to be used, the mapping no longer work.
To work around the issue you have two possible's way;
Add a timeout in the script's beginning;
timeout /t 60
or add a delete script first before the mapping;
NET USE * /DELETE /YES persistent: yes
Be sure that setting is set too, set it if not already before trying to make the workaround;
Computer Configuration
» Administrative Templates
» System
» Logon
» Always wait for the network at computer startup and logon
Some other mentionned that Enabling SMBv2 could help, but it all depend on your environnement, as in my case it happened between Windows 10 2004 client and a new DC in 2019.
Hi, Today I wanted to share a small tip if you want to enable local write for the HCU / HKEY_USERS registry hive with UWF enabled.
By default UWF does not allow to exclude the HCU/ HKEY_USERS, you will got error if you try to exclude those registry path.
The tip seem small, but it's not intuitive to do it with UWF. The tip is to exclude the NTUSER.DAT folder where those settings are wrote. c:\users\ if you want to exclude all user profile, or just c:\users\userx\ntdata.* where you want to exclude the registry.
With such exclusion it would be mandatory to exclude that registry hive;
Computer\HKEY_LOCAL_MACHINE\SOFTWARE\Microsoft\Windows NT\CurrentVersion\ProfileList
That exclusion would make sure Windows will remember each profile created inside the computer.
Thanks everyone
Popular Tags
Archives
-
2026 (22)
- November 2026 (1)
-
October 2026
(16)
- Blog content imported
- Added language; Hindi
- Added more contents for Polish
- App Review: Go Talk Now
- New language added; portuguese
- Website hardened for external link
- New spam for App Developper
- Website maintenance
- Tech Tip: Meraki firewall possible parental control
- New apps release for Android
- Router review - Sophos UTM
- Tech Tip: ASUS parental's control for home router
- Tech Tip: Amazon Fire Tablet Parental's control
- Youtube Restriced Mode
- Ad network for small COPPA website
- 100K visit Milestone achieved !
- September 2026 (3)
- August 2026 (2)
- 2024 (4)
-
2023 (19)
- December 2023 (2)
- October 2023 (6)
- September 2023 (2)
- July 2023 (1)
- June 2023 (1)
- May 2023 (2)
- April 2023 (1)
- February 2023 (2)
- January 2023 (2)
-
2022 (26)
- December 2022 (3)
- November 2022 (5)
- October 2022 (4)
- September 2022 (2)
- July 2022 (2)
- May 2022 (1)
- March 2022 (1)
- February 2022 (4)
- January 2022 (4)
-
2021 (15)
- December 2021 (4)
- November 2021 (1)
- October 2021 (2)
- September 2021 (1)
- August 2021 (1)
- May 2021 (1)
- April 2021 (1)
- February 2021 (1)
- January 2021 (3)
-
2020 (18)
- December 2020 (2)
- November 2020 (1)
- October 2020 (2)
- September 2020 (2)
- August 2020 (1)
- July 2020 (1)
- March 2020 (1)
- February 2020 (2)
-
January 2020
(6)
- Windows 10 IoT Terminal Deployment – Part 4 – Apps Publishing (HPDM - HP Device Manager)
- Windows 10 IoT Terminal Deployment - Part 2 - Protect the Hard Disk ? - Deploy Write Filter !
- Office 2019 / 365 Deployment
- Windows 10 IoT Terminal Deployment - Part 1 - Introduction
- Microsoft Team support for CentOS 7 / RedHat
- Prevent Office from saving to OneDrive by default
-
2019 (29)
- December 2019 (3)
- November 2019 (3)
-
October 2019
(8)
- Microsoft Q&A Launch !
- Windows Server 2019 OEM Activation problem (VM)
- StackOverflow moderation
- Microsoft Exchange Information Store Error - EventID 5003 | EventID 3154 - Time error
- Windows 10 - Update Stay at Download Waiting
- Windows Server 2019 Domain Controller - Ready for production ! (KB4516077)
- 0365 - Exchange Online X-Sender Spam Problem
- Active-Directory - Invoke-InternalEnsureADDSComponentInstallState not recognized - DCPromo
- September 2019 (1)
- August 2019 (1)
- July 2019 (2)
- April 2019 (1)
- March 2019 (1)
-
February 2019
(7)
- RDS: HP Thin OS resolution problem in Full Screen mode !
- Unable to rename domain controller: Account already exists
- Windows Update Error 80243004
- Windows 10 and the faulty network adapter
- Windows Server 2019 RDS: Install Error: dismapi_error__failed_to_enable_updates rds-web-access
- Windows Machine Unknown state on ESX
- RDS: Published App + Dell / Wyse ThinOS + Juniper DHCP relay option
- January 2019 (2)
-
2018 (28)
- December 2018 (1)
- November 2018 (6)
- October 2018 (1)
- September 2018 (2)
- August 2018 (4)
- July 2018 (2)
- May 2018 (1)
-
March 2018
(7)
- Windows 7/10 + Terminal + SmartCard Redirection with XenDesktop
- Windows 7/10, vSphere 5.5+, Citrix Desktop Studio Power State Unknown
- Logon Failure: The target account name is incorrect
- DNS Server Service - Error 1717: The interface is unknown
- Migrating files from an Active Directory Domain to another, unblocking the files ?
- Active Directory: Reset the clock on an expired password for an account
- OneDrive on Local Account ?
- February 2018 (2)
- January 2018 (2)
-
2017 (18)
- December 2017 (1)
- October 2017 (1)
- September 2017 (3)
- August 2017 (3)
- July 2017 (3)
- June 2017 (6)
- April 2017 (1)
-
2016 (26)
-
October 2016
(24)
- Windows Server - Prevent users from changing printer preferences for color
- Windows Server 2012 R2 - Firewall Logging for RDP (or any other service!)
- Windows VDA - Script to re-install the Microsoft Update add-on
- Windows VDA / Terminal Server session - Kill for good that Java update Warning !
- The Citrix purge ! part 1
- Windows - Outgoing Fax in the Console
- SQL Server 2014 on a Domain Controller ?
- Windows VDA + Pre Deploy Juniper client / Pulse Secure
- How to add non latin entry in the Windows Host file ? (%SystemRoot%\System32\drivers\etc\hosts)
- Windows Remote Desktop Service - Manually creating a .RDP file
- Microsoft Office 2013 32-bit over 64-bit error
- Windows - How to easily deploy XenApp multiple farm config for a user
- Windows Server 2012 R2 KB3185279 & KB3185331 seem to break Google tip to block Youtube with DNS
- Microsoft Offer some Virtual Machine for testing purpose
- In Windows Server 2012 R2, and error copying file name too long ?
- Windows Server - Stress that spooler ! - The terminal Server session will love you after
- Windows/Linux/BSD - How to check if the memory is functioning in ECC mode
- PowerShell - RDS - XenApp - Force password change for account near passoword expiration date
- Temporary file from UsrClass.dat (sometime associated with NTUSER.dat)
- How to export Event Viewer data to Excel with PowerShell
- Visual Studio 2015 on Windows Server 2012 R2
- Remove any trace of an Antivirus was installed (WMI)
- Windows VDA + Roaming Profile + OTP program
- Windows VDA – KMS problem - Resetting rearm count
- September 2016 (1)
- June 2016 (1)
-
October 2016
(24)
- 2015 (2)
-
2014 (5)
- November 2014 (3)
- March 2014 (1)
- January 2014 (1)
-
2013 (10)
- November 2013 (2)
- October 2013 (1)
- August 2013 (3)
- May 2013 (2)
- February 2013 (2)
- 2012 (2)
-
2011 (7)
-
June 2011
(7)
- The hypervisor was not contactable at the supplied address
- Wyse Xenith FTP bug from old firmware.. (post 1.5.xx)
- Messaging between Desktop in XenDesktop
- Unknown publisher.. small annoyance
- Best Practices for Configuring Provisioning Server on a Network
- Citrix XenDesktop and McAfee EPO script
- How to cold reset an APC ups
-
June 2011
(7)
- 2010 (2)