Windows 10 - NFS Mapping Error - Network Error - 53 Type NET HELPMSG 53 for more information
December 30, 2019, 10:34 pmHi everyone
If you find yourself with such error when you try to map a network drive in NFS;
Network Error - 53
Type 'NET HELPMSG 53' for more information
Please know that some tips exist to diagnose the error.
1- Make sure the NFS client is installed on the Windows 10.
2 - Make sure to use that registry fix if the mapping is on a restricted port;
HKLM\Software\Microsoft\ClientforNFS\CurrentVersion\Default\
UseReservedPorts := 0 (or 1) - DWORD32
3 - Make sure to use that registry fix to match the mapping GID/UID;
HKLM\Software\Microsoft\ClientforNFS\CurrentVersion\Default\
AnonymousGid := XXXX (usually 1001)
AnonymousUid := XXXX (usually 1001)
4 - In the linux server, make sure the /etc/exports is setting the insecure option.
NFS server has an option of working in insecure mode (Allowing higher incoming port numbers). Windows NFS client often uses higher port numbers. You can enable this option by adding an option to the share
Example: /share *(insecure,rw) ¹
As you can see it's generic tips and of course disabling each firewall can't hurt to diagnose :)
Windows 10 - Set default file association by GPO (Default browser to Chrome in my example)
December 17, 2019, 11:17 pmHi everyone
Today I will share a tip if you need to set the default file association for a bunch of computers by Group Policy.
In my example I want to make Chrome the default browser.
Someone could tell me, why I didnt used the Chrome Group Policy extension to set it by default ? I answer, because the Windows does not take it, as the file association for .htm is not changed by the Chrome GPO extension.
The first thing to do;
Change the default browser to Chrome there;
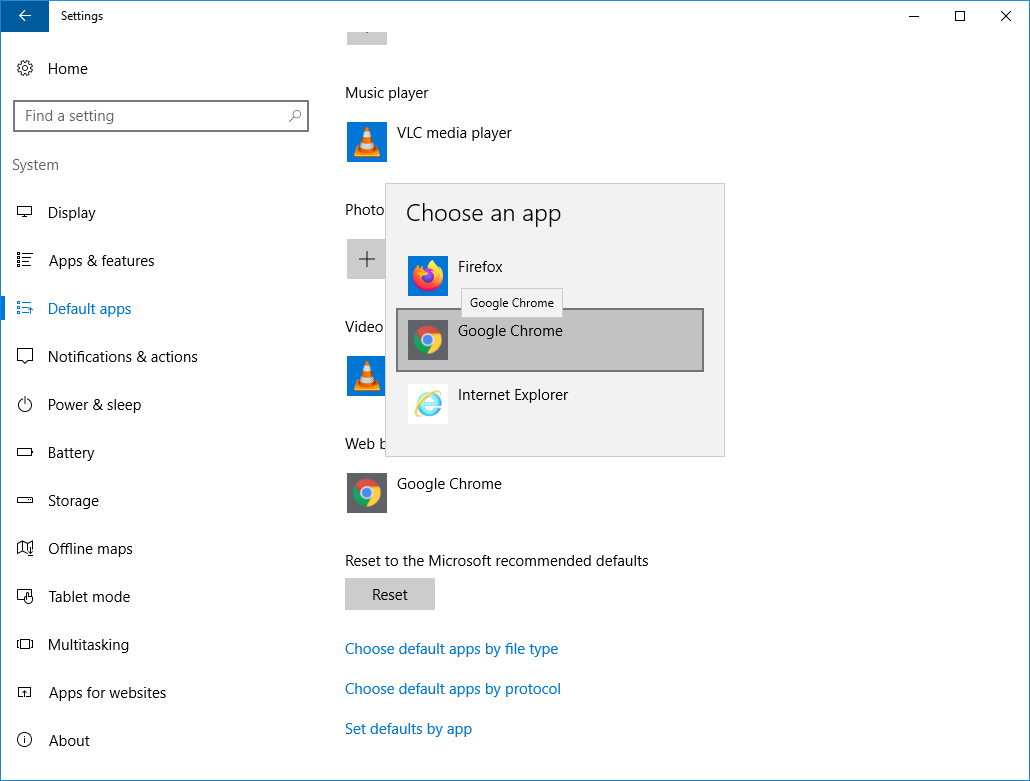
After the change we need to generate an XML's file to know the association set;
dism /online /Export-DefaultAppAssociations:C:\apps.xml
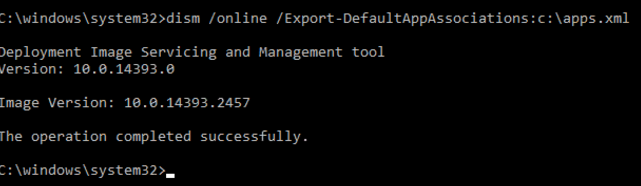
The file content would look that way;
\<?xml version="1.0" encoding="UTF-8"?>
\<DefaultAssociations>
\<Association Identifier=".3gp2" ProgId="WMP11.AssocFile.3G2" ApplicationName="Windows Media Player" />
\<Association Identifier=".adt" ProgId="WMP11.AssocFile.ADTS" ApplicationName="Windows Media Player" />
\<Association Identifier=".adts" ProgId="WMP11.AssocFile.ADTS" ApplicationName="Windows Media Player" />
\<Association Identifier=".fdf" ProgId="FoxitPhantomPDF.FDFDoc" ApplicationName="Foxit PhantomPDF 7.0" />
\<Association Identifier=".htm" ProgId="ChromeHTML" ApplicationName="Google Chrome" />
\<Association Identifier=".html" ProgId="ChromeHTML" ApplicationName="Google Chrome" />
\<Association Identifier=".MP2" ProgId="WMP11.AssocFile.MP3" ApplicationName="Windows Media Player" />
\<Association Identifier=".mpa" ProgId="WMP11.AssocFile.MPEG" ApplicationName="Windows Media Player" />
\<Association Identifier=".MPE" ProgId="WMP11.AssocFile.MPEG" ApplicationName="Windows Media Player" />
\<Association Identifier=".mpeg" ProgId="WMP11.AssocFile.MPEG" ApplicationName="Windows Media Player" />
\<Association Identifier=".mpg" ProgId="WMP11.AssocFile.MPEG" ApplicationName="Windows Media Player" />
\<Association Identifier=".mts" ProgId="WMP11.AssocFile.M2TS" ApplicationName="Windows Media Player" />
\<Association Identifier=".pdf" ProgId="FoxitPhantomPDF.Document" ApplicationName="Foxit PhantomPDF 7.0" />
\<Association Identifier=".ppdf" ProgId="FoxitPhantomPDF.PPDF" ApplicationName="Foxit PhantomPDF 7.0" />
\<Association Identifier=".TS" ProgId="WMP11.AssocFile.TTS" ApplicationName="Windows Media Player" />
\<Association Identifier=".TTS" ProgId="WMP11.AssocFile.TTS" ApplicationName="Windows Media Player" />
\<Association Identifier=".WPL" ProgId="WMP11.AssocFile.WPL" ApplicationName="Windows Media Player" />
\<Association Identifier=".xdp" ProgId="FoxitPhantomPDF.XDPDoc" ApplicationName="Foxit PhantomPDF 7.0" />
\<Association Identifier=".xfdf" ProgId="FoxitPhantomPDF.XFDFDoc" ApplicationName="Foxit PhantomPDF 7.0" />
\<Association Identifier="http" ProgId="ChromeHTML" ApplicationName="Google Chrome" />
\<Association Identifier="https" ProgId="ChromeHTML" ApplicationName="Google Chrome" />
\</DefaultAssociations>
After that we need to create our GPO;
It's in Computer Configuration\Administrative Templates\Windows Components\File Explorer\Set a default associations configuration file setting
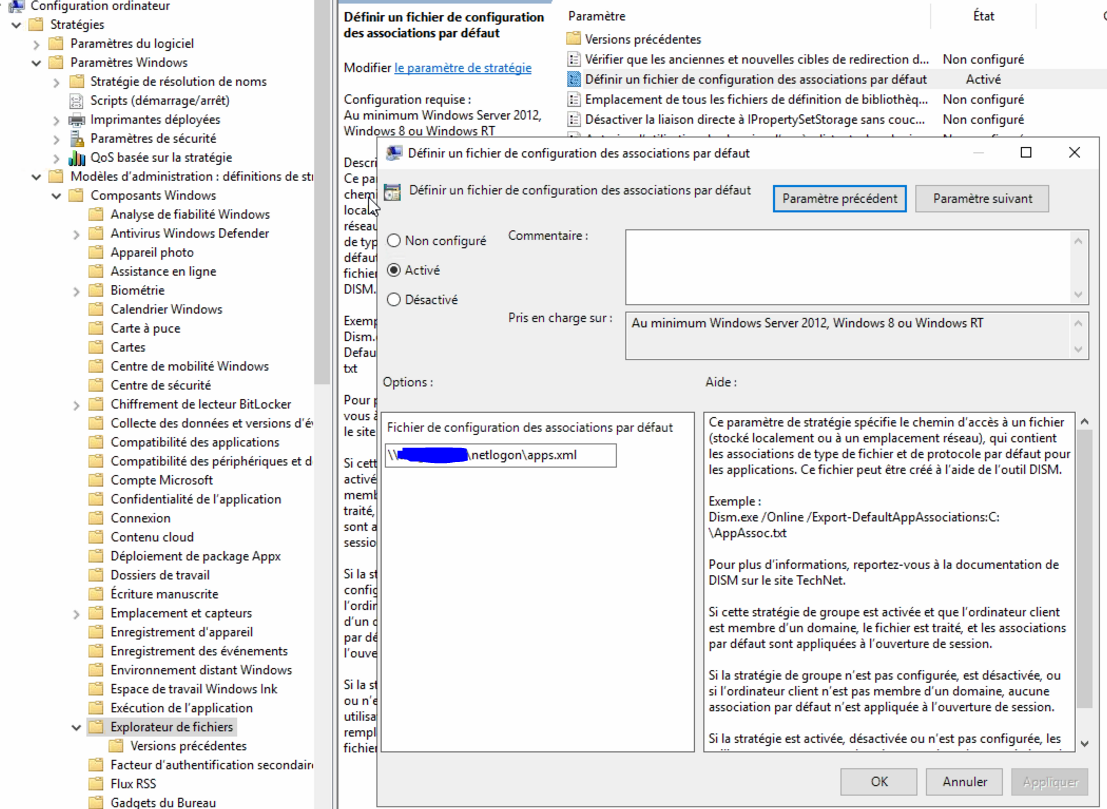
As you can see I put my file inside NETLOGON, as all computer usualy have access there.
After that your default file association should work good ! :)
How to automount a USB device class in Windows Server Virtual Machine from a ESX
December 1, 2019, 9:52 pmHi everyone!
Today I will share a tip if you need to automount some USB device inside your Windows VM.
The goal can be to auto mount some necessary devices, in my case it was to aumount USB HDD used for the backup chain.
The first step is to mount it to the VM with the ESX's control.
When it's mounted, you will be able to naviguate there to find the corrcet ID;
HKLM\Machine\CurrentControlSet\Enum\USB
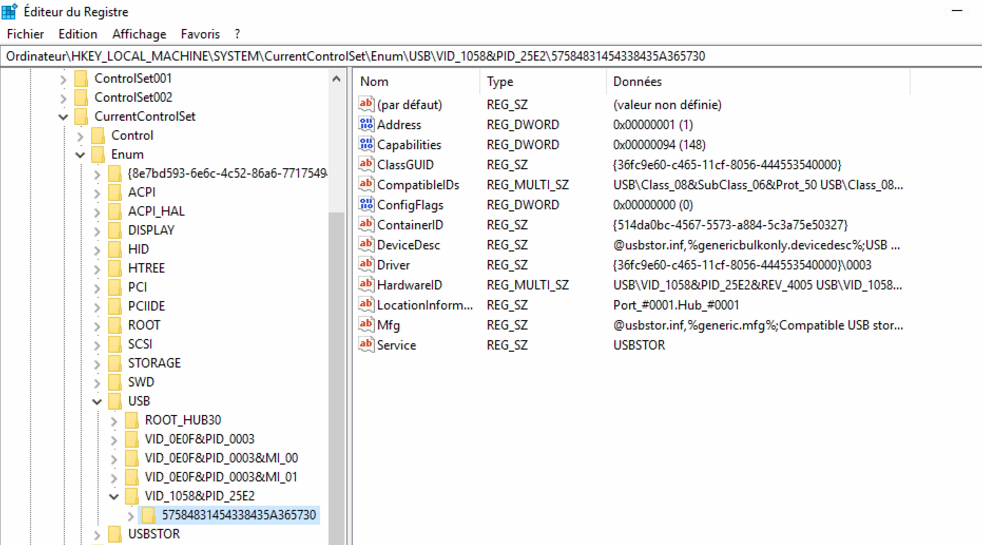
From there we have our USB ID; Check the line HardwareID
We now need to go to our ESX datastore to edit the VM .vmx's file;

In the file VMX, we add that line;

usb.autoconnect.device0 = "0x1058:0x25e2"
As you can see we used our hardwareID to make that entry inside the VMX
Time to test after, unplug and plug the device, and it should reconnect now :)
Windows 2019 RDS | Publishing RADC shortcut on the Desktop
November 25, 2019, 10:54 pmHi everyone
Today I wanted to share a small tip that I found if you publish Work Ressource items to your computers, but you want to publish a icon into the desktop of the user.
By default RADC support only to display the item inside your Start Menu like so;
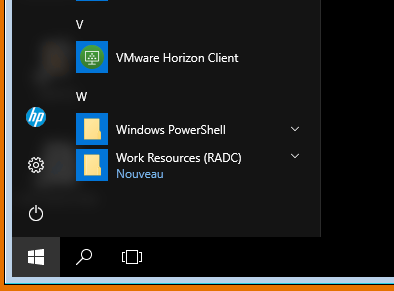
If your customers are used to the Citrix's way to publish to the desktop. I suggest a small folder shortcut to the RADC's ressources.
The path to use is;
%AppData%\Microsoft\Windows\Start Menu\Programs\Work Ressources (RADC)
With that path you can create a small GPO that create the icon inside the user desktop;
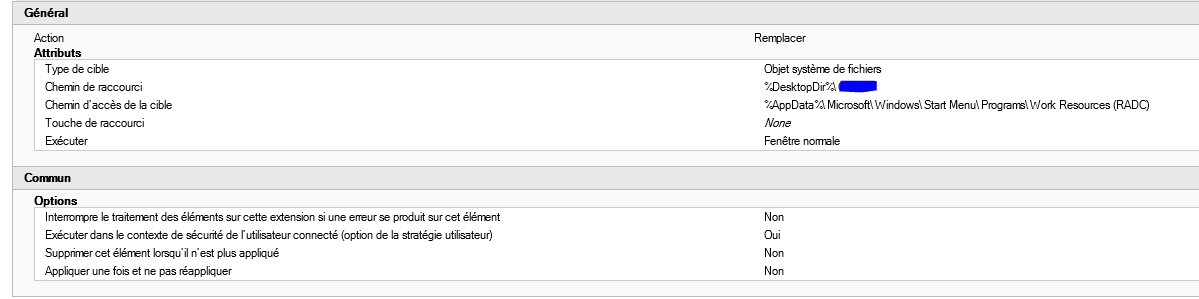
Thanks !
Testing DKIM records with NSLOOKUP
November 21, 2019, 5:31 pmHi everyone
Today I wanted to share a small and handy tip to test any DKIM setup.
I used to generate my DKIM key(s) and my problem were that I do not control the DNS's server which hold my public DKIM's key pair.
As such at first when I was sending a email to a source like hotmail.com, the header was showing me that;
dkim=fail (invalid public key)
As such, now I had to dig the why, and many website offer to check the DKIM, but I was stumbled on how to do it by hand myself.
I found that nslookup was the saviour.. again.. :)
So the tip is to issue;
nslookup
set q=TXT
# There you type your DKIM selector for your domain;
SELECTOR._domainkey.yourdomain.com
So if your selector is DKIM_test and your domain is contoso.com;
The string will look like that;
DKIM_test._domainkey.contoso.com
The result would be the current key stored for the domain for that selector;
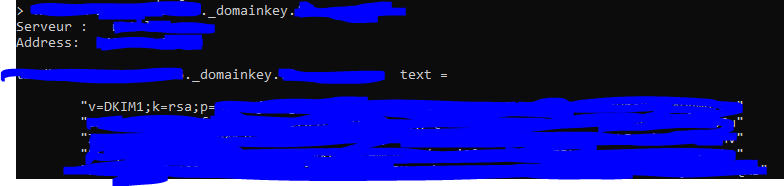
In my case the encryption key was cuted, as some DNS server limit the TXT field to 255 characters, so the field must be split to work good.
Thanks everyone